Face Embroidery Tutorial
This tutorial will show you how to embroider a face on a knitted doll, such as the Little Mermaid Topsy-Turvy Dolls.
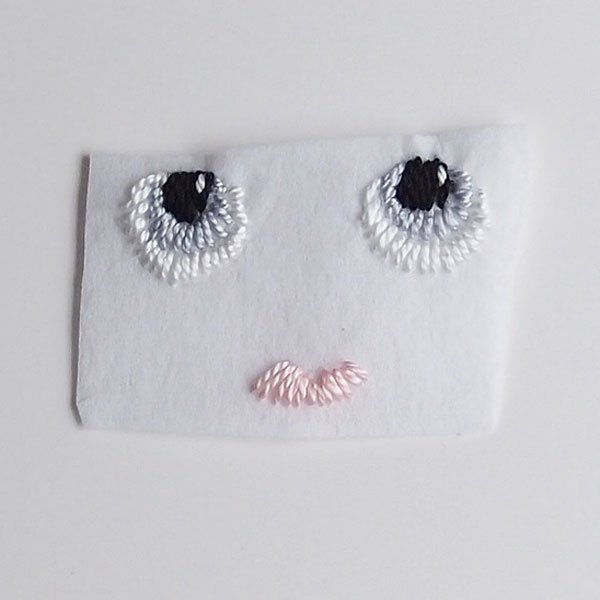
Place a scrap of white heavyweight non-woven, non-fusible interfacing over the appropriate face template found in the pattern and trace with a sharp pencil. Be sure to use a heavy interfacing that is sturdy enough to sew into. Using desired iris color, embroidery needle, and satin stitch, embroider in a radial pattern leaving the pupil area bare. Using black and satin stitch, fill in the pupil with vertical stitches. Using white and satin stitch, embroider the whites of the eyes in a radial pattern and place 1 stitch in the top right corner of each pupil for a highlight. Using pink and satin stitch, embroider lips.
Eyes and mouth embroidered onto interfacing scrap before being cut out.
Trim around each eye and lips, leaving a scant 1/8-inch [0.5 cm] border of interfacing, being careful not to cut the stitches.
Pin eyes on head, approximately 11 rows from top circle of stitches and 3 stitches apart. Using dollmaking needle and white sewing thread, tie a knot in the end of the thread, then insert the needle through the back of the head and come out through the edge of the eye. Whipstitch eye in place through interfacing border, and finish off by running the needle out through the back of the head, then in and out through another spot. Pull gently on the thread, then cut near back of head. The thread end should disappear into head. Repeat for other eye. Center lips approximately 5 rows below eyes and sew as for eyes.
Pin eyes to head, using the knit stitch grid to help you position them. Use a dollmaking needle to sew eyes to head.
With perle cotton or 3 strands of black floss and dollmaking needle, use outline stitch to outline top half of each eye and 3 eyelashes at outer corner of each eye. Using perle cotton or 3 strands of desired color of floss, make eyebrows with outline stitch, using the face template for reference. Using pink floss or perle cotton, use outline stitch to outline lips.
The finished face


